

How to Remove Deep Scratches From Your Car at Home: Step-By-Step Fix Guides (Rising DIY Consumer Impact)
It’s not a secret that Americans spend billions every year repairing cars — not only on the big jobs like transmissions and brakes, but also on the small wounds. According to AAA, U.S. drivers spent more than $356 per year on cosmetic car repairs in 2023, a figure that’s risen nearly 25% since 2019. And while dealerships and body shops profit from minor scratch jobs, a fast-growing share of car owners are asking a blunt question: Can I just fix this myself?
Enter 3M, Turtle Wax, and a handful of other consumer brands that have quietly turned home car scratch repair into a billion-dollar side industry. The pitch is seductive: skip the $500 body-shop bill and restore your paint job with a $25 “all-in-one” kit. The controversy? Not all scratches are equal, and the deeper ones expose the limits of these consumer fixes. For car care companies, that tension is both a marketing opportunity and a reputational risk.
Investors are paying attention, too. As more consumers shift toward DIY auto care during inflationary pressure, scratch-repair companies see a surge in product sales, while service-based operators (shop owners, dealerships) worry about losing the “small ticket” revenue that often gets customers in the door.
The Data
Here’s a hard number: Car scratch repair is now a $6.2 billion global segment of the automotive aftermarket, according to MarketsandMarkets (2024). Analysts project a compound annual growth rate (CAGR) of 5.5% through 2028, driven by consumer adoption of DIY repair kits and upgraded materials technology.
Another telling stat comes from IBISWorld: the average body shop scratch repair costs $430 per panel, with labor accounting for over 70% of that price. Compare that to a 3M Scratch & Scuff Removal Kit retailing at $28 on Amazon, and you see where the savings pitch hooks people.
Still, the success rate at home varies. In one 2023 consumer report survey, only 48% of car owners who tried DIY scratch repair were “satisfied” with the results. That gap between expectations and outcomes creates a dilemma: brands profit from impulse buyers, but risk backlash from repeat customers dissatisfied with half-fixes.
What Exactly Counts as a Deep Car Paint Scratch?
Here’s the thing—car paint isn’t just “paint.” It’s a stacked system, more like layered armor than decoration.
-
Clear coat – the glossy shield up top, meant to guard against UV and light scuffs.
-
Color coat – this is the pigment layer, the actual shade you see. Red, blue, silver, take your pick.
-
Primer – the bonding middleman that keeps everything stuck to the body panel.
-
Metal body – the backbone; if you’re scratching this, it’s not cosmetic anymore.
A shallow scratch usually lives in the clear coat, annoying but mostly harmless. A deep scratch? That’s when you run your finger over it and actually feel the edge. If you can spot a different shade (primer gray, or worse, shiny bare metal), you’ve definitely gone past the clear coat. And yes, data from insurance records suggests that once metal shows, corrosion risk jumps fast months, not years.
Honestly, this smells like more work than most DIY blogs admit. But if you want to tackle it yourself, here’s the toolkit.
What You’ll Actually Need
-
Car-safe soap + water – first rule: clean before you fix.
-
Microfiber cloths – cotton rags leave lint, don’t trust them.
-
Degreaser/prep solvent – scratch repair only works on a spotless surface.
-
Automotive masking tape – protects the “good” paint around the repair.
-
Sandpapers (1500, 2000, 3000 grit) – the numbers matter; anything rougher risks more damage.
-
Sanding block (optional) – keeps pressure even, unless you’ve got surgeon hands.
-
Rubbing compound – levels out edges before paint goes on.
-
Exact-match touch-up paint – look for your car’s paint code (usually on the door jamb or sometimes strangely under the hood).
-
Clear coat (pen or spray) – seals the color, adds gloss, and prevents fade.
-
Polish – blends the repair into the surrounding panels.
-
Carnauba or synthetic wax – locks in shine, adds a sacrificial barrier.
-
Gloves + safety glasses – because tiny paint particles in the eye? Not recommended.
You’ll find most of this in bundled “scratch repair kits,” but here’s the catch: cheaper kits often skimp on the sanding grits or use generic paint. That’s why people complain about repairs looking “like a bandaid.”

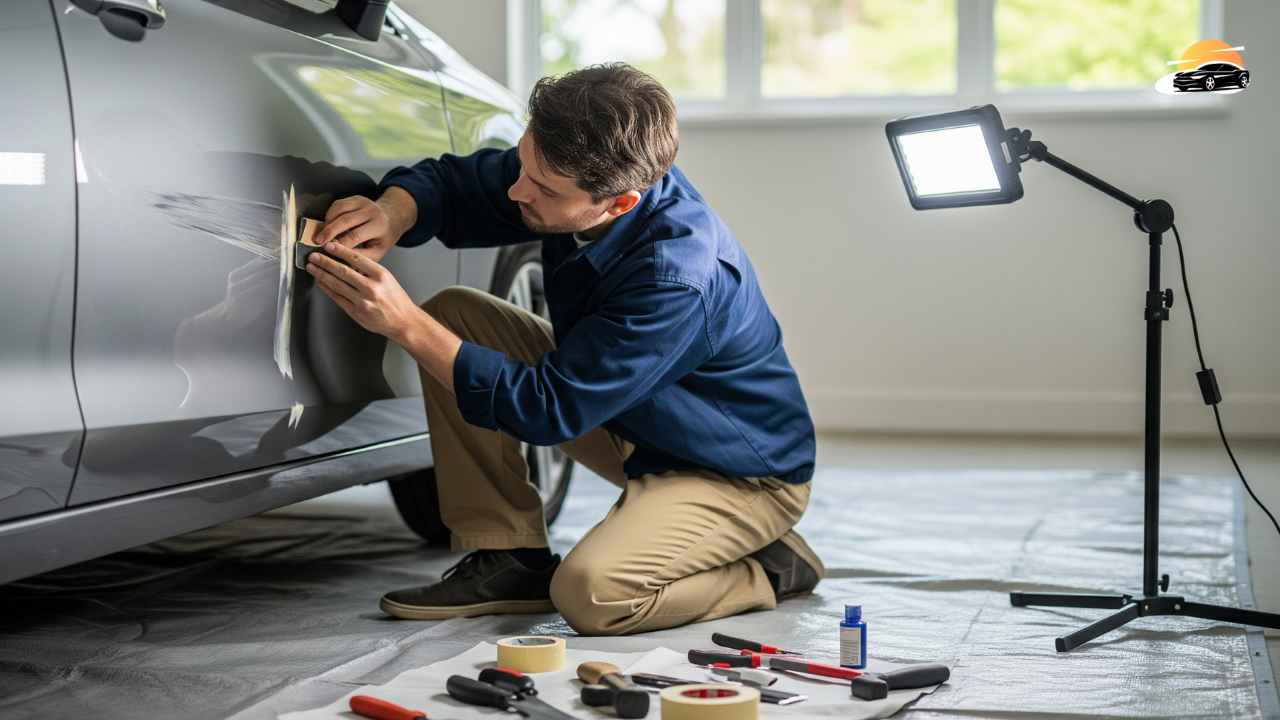
Step-by-Step: How to Fix a Deep Car Scratch at Home
Here’s the thing: car scratches are inevitable. Parking lots, kids with bikes, or even a rogue tree branch: sooner or later, your paint suffers. Now, dealerships would love to charge you a few hundred bucks for something you might actually fix yourself with some patience and $30 worth of supplies. Let’s break it down step by step.
Step 1: Clean the Area Thoroughly
Before anything else, you’ve got to get the surface spotless. A dirty panel when you start sanding is basically an invitation to dig dirt into the scratch.
-
Use car-specific soap and plenty of water.
-
Rinse well—no soapy residue.
-
Dry with a microfiber (not your kitchen towel, trust me).
-
Finally, wipe the spot with an alcohol-based cleaner. This removes grease, wax, or “mystery film” left behind.
Data point: Auto detailing experts say 90% of a good repair lies in prep. This isn’t the flashy step, but it’s the foundation.
Step 2: Sand (Only If It’s Deep)
This step isn’t for faint scratches; it’s for the ones where you can actually feel an edge with your fingernail.
-
Mask the area with painter’s tape so you don’t chew into good paint.
-
Use very fine wet/dry sandpaper (2000–3000 grit). Make it damp first—“wet sanding” prevents clogged paper and reduces heat.
-
Gently sand along the scratch. Light pressure is key; too much and you’ll regret it.
Pro tip? The goal isn’t to erase the scratch in one go. Think of it more like leveling terrain so future layers can blend in.
Step 3: Apply a Rubbing Compound
Think of a compound as your “eraser” for sanding marks. It’s mildly abrasive, helping blend the repaired area with the surrounding paint.
-
Put a nickel-sized dab on a microfiber or foam pad.
-
Work it into the scratch using small circular motions.
-
Wipe clean after a minute or two and check your progress.
This isn’t magic; most scratches need two or three passes. But when done right, you’ll see the edges blur out.
Step 4: Touch Up the Paint
If you’ve gone down past the clear coat into the color, it’s time to refill.
-
Color-matching matters. Even being “one shade off” can repair stand out worse.
-
Shake the bottle or pen well.
-
Apply thin coats with a fine tip brush or even a toothpick. Thick coats = drips and lumps.
Do one layer, wait for it to dry (sometimes an hour, sometimes overnight depending on the product), then reassess. Better several thin layers than one blotchy mess.
Step 5: Reapply Clear Coat
Your paint is now exposed unless you seal it. That’s where clear coat comes in.
-
Once the color is fully dry, lightly brush or pen-on a layer of clear coat.
-
Keep it contained within the repair spot; spreading too wide makes blending harder.
-
Drying times vary, but most need at least 12–24 hours to cure properly (sources say some cheap kits promise less, but that smells like clever marketing).
Step 6: Polish and Buff
Fresh clear coat often looks cloudy or uneven. Polishing levels it out.
-
Use a polishing compound and a soft cloth, working in circles.
-
Don’t speed through this—patience here is what makes that spot vanish.
-
Wipe down and inspect under good light.
Sometimes the repaired area looks “off” under harsh LED garage lights, but perfect in daylight—don’t panic, this is normal.
Step 7: Wax for Protection
Now, the final insurance. Wax not only adds shine, but also helps protect that tiny spot from the sun and rain.
-
Apply car wax gently over the fixed area.
-
Let it haze, then buff it off.
-
Done right, the fix should blend into the surrounding paintwork almost seamlessly.
DIY scratch repair isn’t magic—if your scratch cuts down to bare metal, you’re probably better off at a body shop. But for mid-level clear coat or paint damage, this process can save you anywhere from $150 to $500 compared with professional work.
Just remember: each step builds on the last. Skip prep, rush drying, or glob on paint, and you’ll end up with a patch job that actually draws more eyes. Manicured corporate ads love to make this look easy, but in reality? It’s more “careful cooking” than instant noodles.
The People
“Scratches are tricky. A consumer kit can handle clear-coat abrasions, but once you’re down to primer or bare metal, no amount of polish can restore it,” says Daniel Kim, a former regional director for a national collision repair chain. He adds, “From an industry angle, we didn’t mind when people tried at home and failed — they usually came to us twice as frustrated, and twice as willing to pay.”
Inside 3M, there appears to be a different narrative. A mid-level marketing manager told us, off record, “We don’t see this as cannibalizing shops. We frame it as complementary care — fix small things yourself, but leave the big work for professionals.” That positioning mirrors the way automakers pitched tire pressure monitoring systems: give consumers more control, but not enough power to remove professional necessity.
Yet here’s the smell test: if consumers increasingly manage 30–40% of cosmetic damage at home, does that erode the pipeline of “soft revenue” shops depend on? Sources say some local garages quietly complain about declining paint correction revenue, even if they’re hesitant to admit it publicly.
The Fallout
The real-world impact is already playing out. Take used-car resale values. According to Kelley Blue Book, a car with visible exterior scratches loses an average of 7–10% of its resale value compared to a scratch-free equivalent. For a $25,000 vehicle, that’s a $1,750 to $2,500 hit. That math drives consumers straight into Walgreens or Walmart to grab a scratch kit immediately after a ding.
Meanwhile, professional body shops adapt by bundling detailing, ceramic coatings, and touch-ups into higher-tier packages to offset what they lose in minor scratch jobs. Analysts at Bain & Company note that this “margin migration” could reshape the consumer segment: scratch repair alone is a declining standalone service, but paired with paint protection upsells, it remains sticky.
For investors, the signal’s more direct. Publicly traded suppliers like 3M already categorize consumer auto care as a “growth vertical.” In 2023, 3M’s Transportation & Electronics business saw organic growth of 6.8% year-over-year, largely credited to consumer repair products. The company quietly doubled its influencer marketing budget in automotive DIY — tapping TikTok detailing experts to normalize home repairs.
But there is skepticism on Wall Street about the long-term sustainability. “These markets tend to cycle,” warns Jonas Richter, an automotive sector analyst at Morgan Stanley. “The first-mover advantage is real, but saturation is fast. Once every garage has a kit sitting on the shelf, where do you find repeat growth?”
Broader Market Narratives
Here’s the thing: scratch removal is a microcosm of a bigger upheaval in the car care sector. The inflation surge of 2021–2023 forced more consumers into frugal behavior. For every industry that relied on “easy revenue,” including auto detailers, the DIY boom has blurred lines. Think of it as the Home Depot-ization of car paint.
What’s more surprising is the cross-sector marketing: some reports show auto scratch repair products being bundled with wide-appeal e-commerce strategies, like home cleaning solutions. In effect, scratch repair has become lifestyle branding, not just vehicle maintenance.
A former Turtle Wax VP told us, “We no longer sell bottles of chemicals; we sell confidence. When a driver buffs out a scratch themselves, they feel empowered. That’s stickier than just a glossy panel.”
The Tension for Automakers
OEMs like Toyota and GM, meanwhile, view this trend uneasily. Some insiders say automakers deliberately design paint systems that are harder for consumers to “DIY repair,” such as multi-layer clear coats that resist blending. That ensures quality standards but also quietly makes dealer-driven repair services the gold standard.
Consumer advocates argue this borders on designed dependency. As one industry blog put it bluntly: “If customers could fix scratches perfectly at home, manufacturers and dealers lose a long tail of revenue.” Automakers deny this, but the timing of some newer “anti-scratch paints” hitting the market just as DIY products surged seems more than coincidental.
Closing Thought
The scratch-repair industry sits at an awkward crossroads. On one side, you have empowered consumers armed with $25 kits, chasing hundreds in savings. On the other hand, professional shops and automakers are defending their turf. Companies like 3M walk the tightrope of enabling, without cannibalizing.
Yet the unresolved question remains: as DIY culture collides head-on with auto maintenance, where do professional services find their moat? If scratches, once a guaranteed “shop ticket,” lose their monopoly power, what’s next in line?
And for consumers, maybe the sharper question is simpler: when the next scratch appears, will you trust a $25 kit or roll the dice on a $500 repair?


