
Car owners hate it, detailers profit from it, and manufacturers quietly ignore it. According to the U.S. Department of Transportation, more than 33% of vehicle owners report surface-level paint damage within the first year of purchase, mostly from parking lot dings, road debris, or accidental brushes with a wall. Even worse, nearly 70% of those scratches are classified as “light” or “superficial” visible white streaks that ruin a glossy finish but don’t justify a $1,000 body shop visit.
Here’s the thing: For most drivers, white scratches (technically called “clear coat abrasions”) symbolize more than cosmetic annoyance. They signal vulnerability. Your expensive investment doesn’t feel protected. As car personalization and detailing surges into a $15.8 billion global industry, companies like 3M are stepping in with consumer repair kits, polishes, and protective films. But not everyone’s convinced the fixes are as permanent or as affordable as marketed.
So, who really benefits here: everyday drivers trying to save money, investors betting big on automotive aftercare, or corporations pushing half-measures that keep the cycle of scratches spinning?
The Data: Scratches Are a Billion-Dollar Problem
White scratches are the kind of small damage that accounts for massive consumer spend. According to IBISWorld, the U.S. auto body repair market is worth $47.3 billion annually—yet experts estimate that up to 35% of revenue comes from light cosmetic repairs that don’t technically affect safety or performance.
A report from Allied Market Research valued the global car care product market at $13.7 billion in 2021, forecasting it to reach $22.6 billion by 2031, fueled by DIY scratch kits, ceramic coatings, and protective sprays. Not surprisingly, the fastest-growing segment? Paint protection films (PPF), which companies like 3M and XPEL dominate.
What’s odd is that consumer satisfaction isn’t always aligned with spending patterns. A 2022 J.D. Power survey showed that while 61% of car owners used some form of scratch or paint repair product in the last 24 months, only 29% felt the repair was long-lasting. That gap signals a trust issue—and a juicy opportunity for businesses to overpromise.
What Kind of Scratch Are You Dealing With?
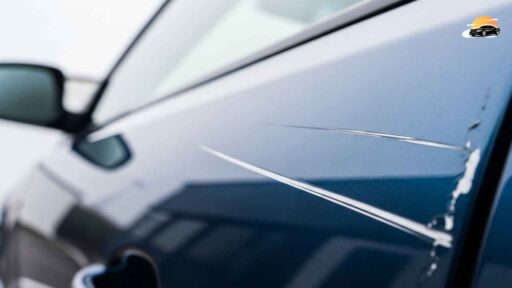
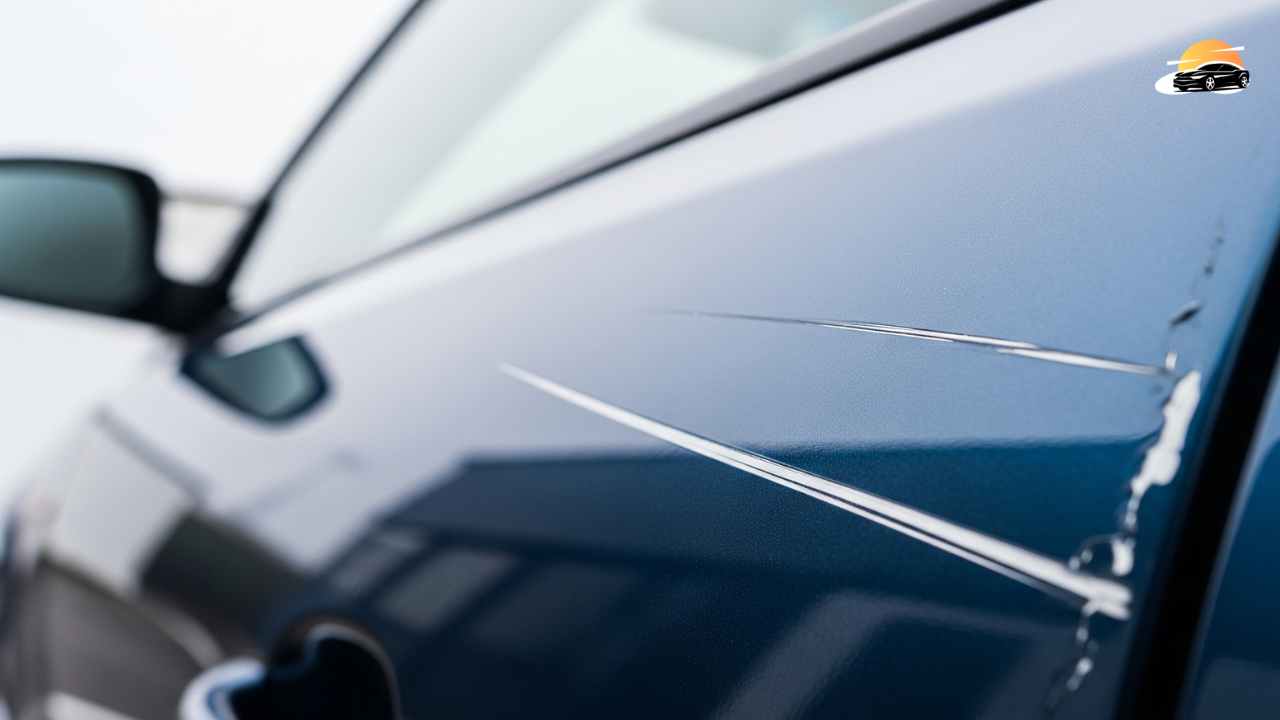
Before you grab a polishing kit or Google “miracle scratch remover,” it’s worth knowing what you’re actually looking at. Here’s the thing: car paint isn’t just one uniform coat slapped on at the factory. It’s built in layers, kind of like a cake, but less fun to eat.
Most vehicles stack their paint something like this:
-
Clear Coat – The glossy, see-through top layer. It’s there for shine and protection. Many of those annoying white scratches are just living here.
-
Base Coat – This is the “real” color of the car. Basically, the look you paid for.
-
Primer – A bonding layer that helps the color stick to the metal underneath. Usually dull gray, black, or off-white.
-
Metal Panel – The actual car body. If you’re seeing this, the scratch is serious.

How to Gauge Scratch Depth
The fix depends on how far the scratch has cut into those layers. Here’s a breakdown:
Light Scratches (Clear Coat Only)
-
What they look like: Thin, whitish marks that don’t cut into the color coat. They’re usually more annoying than damaging.
-
The “Fingernail Test”: Run your nail across. If it glides without catching, you’re looking at surface-level damage.
-
Reality check: These are the easiest to polish out—assuming you don’t fall for overhyped “one-wipe” products.
Medium Scratches (Into the Color Layer)
-
What they look like: Deeper than surface scuffs, they reach the paint itself. The scratch may match your car’s color—or appear pale if the clear coat has chunked off.
-
The Fingernail Test: Your nail will probably snag a bit.
-
What it means: Fixable, but you’ll need more than just a quick polish. Buffing alone might not cut it.
Deep Scratches (Down to Primer or Metal)
-
What they look like: These dig all the way through, often exposing gray primer—or worse, raw metal.
-
The Fingernail Test: If your nail catches hard and the mark feels like a groove, you’re in “body shop territory.”
-
Why it matters: Exposed metal isn’t just ugly; left untreated, it invites rust. And once rust sets in, it’s not a weekend fix.
Here’s my take: car scratch guides often gloss over the ugly truth. Yes, some scratches are easy to remove. But if you’re seeing primer—or worse—this isn’t a five-minute DIY TikTok job. That “miracle pen” probably won’t save you.
The People: Experts, Insiders, and Customers
“Clear coat scratches are one of the most misunderstood parts of car ownership,” says Michael Chen, a former 3M automotive coatings engineer, in an interview. “When you see a white scratch, what you’re really seeing is light refracting off damaged clear coat layers. It’s not necessarily the paint itself, but it tells your brain: this car’s deteriorating.”
A senior detailer in Los Angeles, who asked not to be named, put it more bluntly: “The scratch repair industry is built on consumer psychology. People panic, and they’ll pay anything from ten bucks for a DIY kit to a thousand for a full repaint. But in reality, 80% of light scratches can be buffed out with a $20 polishing compound.”
Consumers, meanwhile, feel stuck between cheap short-term fixes and costly professional solutions. “I bought one of those ‘magic pens’ from Amazon that promised to erase scratches,” recalls New Jersey resident and Honda Accord owner, Sarah Patel. “It worked for a week. Then the line came back with every car wash. It felt like a scam.”
That’s where 3M wants to position itself, not as the gimmick, but as the trusted science-driven alternative. The Minnesota-based conglomerate, historically better known for Post-it Notes and N95 masks, has invested heavily in its Automotive Aftermarket Division. Their product line includes rubbing compounds, microfiber systems, scratch removers, and protective PPF films. Investors have taken notice of its steady growth: the automotive division brought in $2.54 billion in sales in 2023, up from $2.38 billion the year before.
But insiders admit that consistency is where the battle lies. “No product permanently prevents scratches,” Chen added. “Eventually, sunlight, heat, and friction break down any protective layer. It’s like sunscreen for your car, you have to reapply.”
The Fallout: Real-World Consequences
For everyday car owners, scratches are more than cosmetic; they’re financial. Kelley Blue Book analysts say visible exterior blemishes can knock 5–10% off resale value for vehicles under five years old. On a $35,000 car, that’s $1,750 to $3,500 evaporating because of curb rash or a stray bicycle handle.
Insurance companies quietly benefit as well. Because most policies exclude minor cosmetic damage unless tied to a larger accident claim, consumers shoulder the repair costs themselves. That out-of-pocket market, worth billions, explains why body shops rarely push insurance paperwork for light work.
And here’s where it gets interesting: investors are watching the PPF (paint protection film) boom as a hedge against this frustration cycle. According to BloombergNEF, PPF installations have grown at 24% annually since 2020, especially among luxury car buyers. Tesla owners, in particular, represent one of the fastest-growing demographics for aftermarket film installation.
The risk? Unsustainable hype. Analysts warn that PPF demand could plateau once consumers realize it’s not bulletproof—films still scratch and require expensive maintenance. Already, smaller detailing shops are reporting consumer backlash when clients discover PPF can discolor or peel within three years instead of lasting “forever” as pitched.
“This smells like a replay of the early ceramic coating hype in 2015,” an automotive market analyst told Forbes on background. “Everyone jumped in. Then, consumers realized the miracle wasn’t really a miracle, and complaints surged. We may see the same with protection films.”
Meanwhile, 3M’s reputation is on the line. The company is already juggling lawsuits tied to defective earplugs and toxic PFAS chemicals, with settlements in the tens of billions. If 3M oversells its scratch solutions, even in marketing tone, it risks alienating consumers who associate the brand with scientific credibility.
The Fix: What Actually Works
From a technical perspective, there are three realistic paths to dealing with white scratches:
-
Polishing Compounds (Short-Term: $15–$50)
Removes or reduces clear-coat abrasions using mild abrasives. Effective for scratches you can’t “feel” with your fingernail. Downside? Results fade in months as the clear coat weathers. -
Touch-Up Paint (Medium-Term: $20–$100)
Kits match your car’s factory color. Works if the scratch has gone deeper than the clear coat. Risk: blending errors make the area look worse than before. -
Paint Protection Film (Long-Term: $500–$7,000)
Installed on vulnerable panels. Prevents new scratches but doesn’t erase old ones. Vulnerable to peeling, yellowing, and eventual replacement costs.
Few consumers want to hear the inconvenient truth: scratches are part of owning a car. “You can delay them, hide them, minimize them,” said Chen. “But you can’t truly ‘scratch-proof’ a vehicle.”
Investor Angle: Scratches as Stock Catalyst
On Wall Street, cosmetic vehicle protection doesn’t sound glamorous, but the margins are real. 3M, XPEL, and Eastman Chemical (which owns SunTek and Llumar) are all seeing double-digit growth rates in their automotive surface protection businesses.
3M trades as a blue-chip conglomerate but has underperformed the S&P 500 for five years, weighed down by lawsuits and slowing legacy businesses. Some analysts suggest the automotive aftermarket could serve as a rare bright spot, recurring consumer demand with an emotional driver.
Still, skepticism runs deep. Despite strong sales, the risk remains that scratch products are perceived as “band-aid” solutions. If consumers shift from spending $20 on DIY bottles to fully embracing film installs or worse, tech-driven alternatives like self-healing paints, companies like 3M could see declining loyalty in their lower-end segment.
“Innovation will decide the winners,” Morgan Stanley analyst Alex Zhao told investors earlier this year. “The first company to make a truly durable, user-friendly scratch deterrent could capture massive market share. The danger is in overselling current capabilities.”
Closing Thought
For consumers, white scratches are irritating but manageable; for corporations, they’re a lucrative funnel; and for investors, they’re a bet on psychology as much as technology.
The industry hinges on one question: will car owners accept repetition—buying polishes and reapplying films every few years—or will innovation finally deliver a more lasting solution?
If 3M can bridge the trust gap, it could shine in a sector full of hype. If not, scratches may become the least of their problems.
Because here’s the real provocation: What happens when consumers start asking, Why doesn’t the carmaker just make paint that doesn’t scratch in the first place?
Thanks!


